
Switching to an electric vehicle changes how you think about refueling, and home charging becomes part of your daily routine rather than weekly trips to a gas station. A Level 2 EV charger installation transforms your home into a personal charging station, delivering charging speeds up to eight times faster than a standard wall outlet and ensuring your vehicle is fully charged each morning. This upgrade means you can restore 25 to 50 miles of range per hour, making overnight charging practical for most daily driving needs.
Installing a Level 2 charger at your home requires understanding electrical requirements, choosing the right equipment, and deciding between professional installation or a DIY approach if you have electrical experience. The process involves assessing your electrical panel capacity, running proper wiring, and ensuring the installation meets local building codes and safety standards.
For EV owners who want reliable home charging without depending on public stations, a Level 2 charger provides the convenience and speed necessary for daily use. This guide covers the technical essentials you need to know, what the professional installation process looks like, and how to prepare your home for this practical upgrade.
Installing a permanent charger at home offers greater efficiency and eliminates reliance on public stations. Many residents choose EV Charger Installation Burlington to simplify daily charging routines and improve property value.
Those considering Electric Car Charger Installation Oakville should ensure their installation includes proper permitting and ESA compliance to guarantee safe and code-approved operation.
Essentials of Level 2 EV Charger Installation for Homes
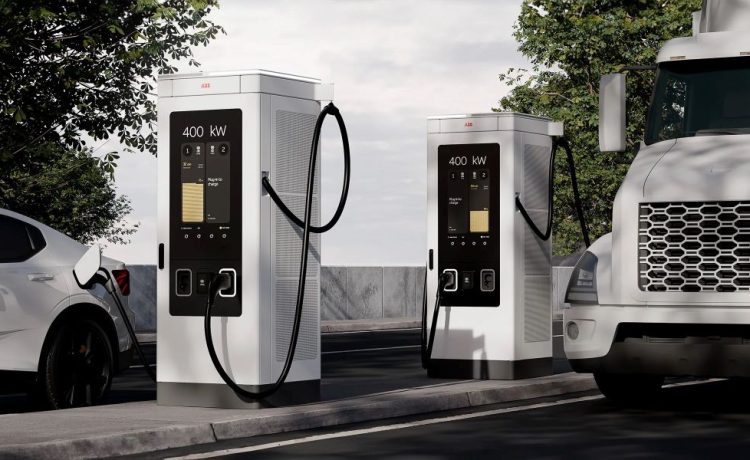
Level 2 chargers operate on 240-volt power and deliver significantly faster charging than standard outlets, typically adding 25-30 miles of range per hour. Understanding the differences between charging levels, installation types, and equipment components helps you make informed decisions about your home EV charger setup.
Comparing Level 1 and Level 2 Charging
A Level 1 charger plugs into a standard 120-volt household outlet and adds approximately 3-5 miles of range per hour. This option requires no installation but takes considerably longer to achieve a full charge.
Level 2 chargers connect to a 240-volt outlet and deliver 25-30 miles of range per hour, completing a full charge in 4-8 hours for most vehicles. The charging speed depends on your charger’s amperage and your vehicle’s onboard capabilities.
For daily driving needs, Level 2 charging provides practical overnight charging that keeps your vehicle ready. Level 1 charging works for drivers with minimal daily mileage or access to workplace charging, but most EV owners find it insufficient as a primary charging solution.
DC fast charging operates differently from both Level 1 and Level 2 options, using direct current to charge at public stations rather than home installations.
How Level 2 Charging Works at Home
Your Level 2 EV charger draws power from a dedicated 240-volt circuit, similar to what powers your electric dryer or oven. The circuit typically runs at 30, 40, or 50 amps, with higher amperage delivering faster charging speeds.
The charging cable connects your vehicle to the power source, converting AC power to DC power through your car’s onboard charger. Your vehicle’s charging capacity limits the actual charging speed, even if your home charger can deliver more power.
Most Level 2 chargers include safety features like ground fault protection and automatic shutoff when charging completes. Smart charger models add WiFi connectivity, scheduling capabilities, and energy usage tracking through mobile apps.
Your electrical panel must have sufficient capacity to support the new circuit without overloading. An electrician evaluates your panel’s available amperage and may recommend upgrades if needed.
Choosing a Level 2 Charger: Hardwired vs. Plug-In
A hardwired charger connects directly to your electrical system without a plug or outlet. This installation provides a permanent, weather-resistant solution that typically supports higher amperage levels and reduces potential connection points for failure.
A plug-in charger connects to a dedicated 240-volt outlet, commonly a NEMA 14-50 receptacle. This option offers portability if you move homes and simpler installation in some cases.
Hardwired installations generally cost more upfront due to additional electrical work but eliminate the outlet as a potential weak point. Plug-in models provide flexibility to unplug the unit for travel or replacement without electrical modifications.
Consider your long-term plans and charging needs when selecting between these options. Renters or those planning to move often benefit from plug-in flexibility, while permanent homeowners may prefer hardwired reliability.
Key Components: Outlets, Cables, and Connectors
The 240-volt outlet serves as the power source for plug-in chargers, with NEMA 14-50 being the most common configuration. This four-prong outlet handles up to 50 amps and matches receptacles used for RVs and heavy appliances.
Your charging cable length matters for reaching your vehicle’s charging port from the installation location. Most cables range from 18 to 25 feet, and you cannot extend them with standard extension cords due to power requirements.
The J1772 connector is the standard plug type for Level 2 charging in North America, fitting all EVs except certain Tesla models. Tesla vehicles require an adapter to use J1772 chargers, though Tesla’s charging equipment includes this compatibility.
Cable management systems, holsters, and wall mounts keep your charging cable organized and protected from weather and vehicle traffic. These accessories prevent cable damage and maintain a tidy charging area.
Professional Installation Process and Home Preparation
Professional installation of a Level 2 EV charger involves a systematic evaluation of your electrical system’s capacity, required permits, and code compliance standards. Licensed electricians follow specific steps to ensure safe, reliable operation while managing costs between $500 and $2,500 depending on installation complexity.
Initial Site Assessment and Load Calculation
Your licensed electrician begins with a comprehensive site assessment to determine where the charger will be mounted and the most efficient path for electrical wiring. They evaluate the distance from your electrical service panel to the installation location, as longer runs increase material costs and complexity.
Load calculation is the critical next step. Your electrician calculates your home’s existing electrical demand and available capacity to ensure adding a Level 2 charger won’t overload your system. Most Level 2 chargers draw 30-50 amps, requiring careful analysis of your total electrical load.
If your home’s electrical panel capacity is insufficient, you may need a service upgrade from 100 to 200 amps. Some installations benefit from a load management system that automatically reduces charging power during peak usage, avoiding costly panel upgrades while maintaining a functional home charging solution.
Electrical Panel and Circuit Requirements
Your Level 2 charger requires a dedicated circuit with its own circuit breaker in your breaker box. This ensures the charger operates independently without affecting other household circuits. Most installations use a 40-amp or 50-amp double-pole breaker, depending on your charger’s specifications.
The electrical wiring must be sized appropriately for the amperage and distance. Your electrician will run copper wire from the electrical panel through conduit to the charging location, often requiring a junction box for connections. Homes without sufficient electrical panel capacity may need a subpanel installed near the garage or charging area.
Your existing electrical service panel must have available slots for the new breaker. Older homes with full panels may require upgrades or creative solutions from your certified installer to accommodate the additional circuit safely.
Permits, Code Compliance, and Inspection
Most jurisdictions require an electrical permit for Level 2 charger installation. Your professional installer typically handles permit applications through your local building department, though requirements vary by location. Permits for EV charger installation generally cost $50-$200.
Local permits ensure installations meet National Electrical Code (NEC) standards and municipal requirements. The building department reviews plans to verify proper wire sizing, breaker ratings, and grounding methods. Some areas have specific regulations about outdoor installations or distance from property lines.
After installation, an inspection by a municipal inspector confirms permit and code compliance. Your electrician must be present during inspection to answer technical questions. Failed inspections require corrections before your charger can be legally energized.
Installation Steps and Costs
Your certified installer mounts the charging unit to a wall or post at the predetermined location, ensuring it’s at a comfortable height for cable management. They connect the electrical wiring to the charger’s junction box and verify all connections are secure and properly grounded.
The electrician then installs the dedicated circuit breaker in your electrical panel and connects the circuit wiring. They test the system for proper voltage, ground continuity, and operation before the final inspection. Some installations include a load balancing system that shifts charging to off-peak hours for cost savings.
Installation costs typically range from $500 for simple plug-in units with existing 240-volt outlets to $2,500 for complex installations requiring panel upgrades or long wiring runs. Labor accounts for $300-$1,500, while materials and the charger unit comprise the remainder. Installation complexity increases with distance from the panel, required trenching for underground conduit, or the need for service upgrades.


